Click the ![]() icon on the toolbar or click "Settings" on the Welcome Screen to open the settings panel. The settings panel is organized into two pages. Click the buttons at the top of the page to alternate between them.
icon on the toolbar or click "Settings" on the Welcome Screen to open the settings panel. The settings panel is organized into two pages. Click the buttons at the top of the page to alternate between them.
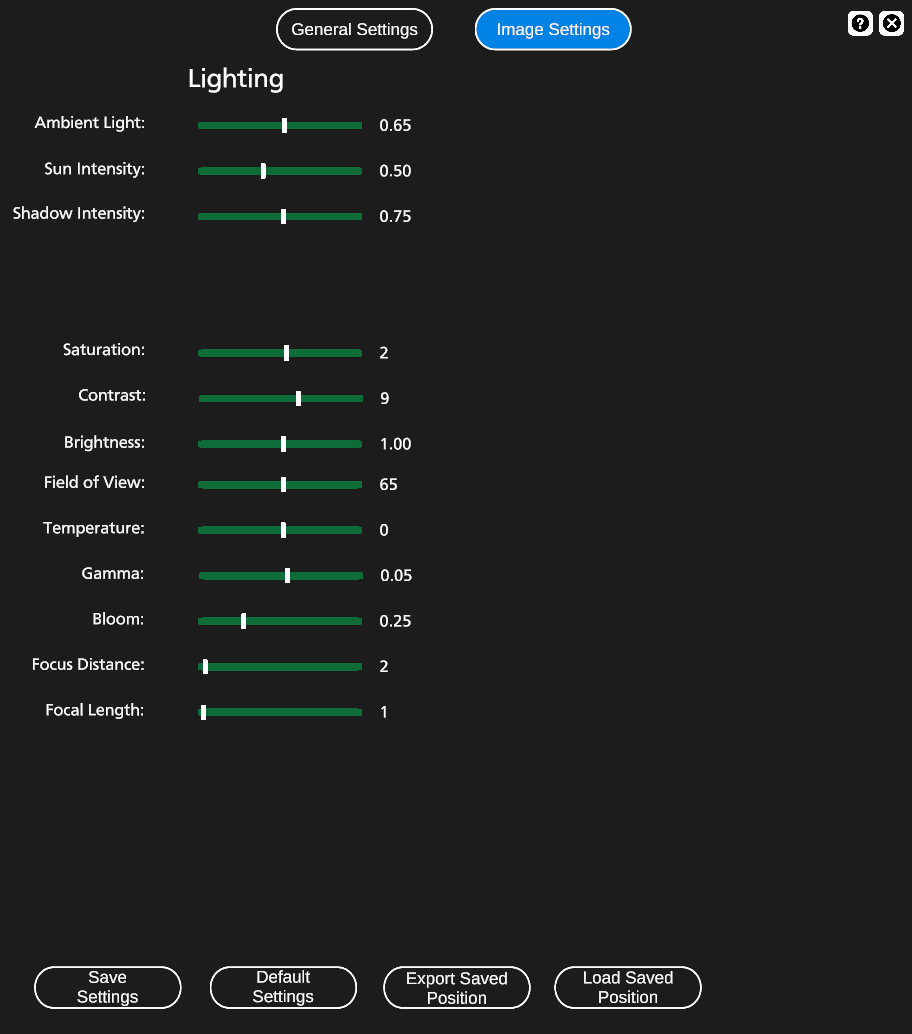
Page 1 (General Settings) Page 2 (Image Settings)
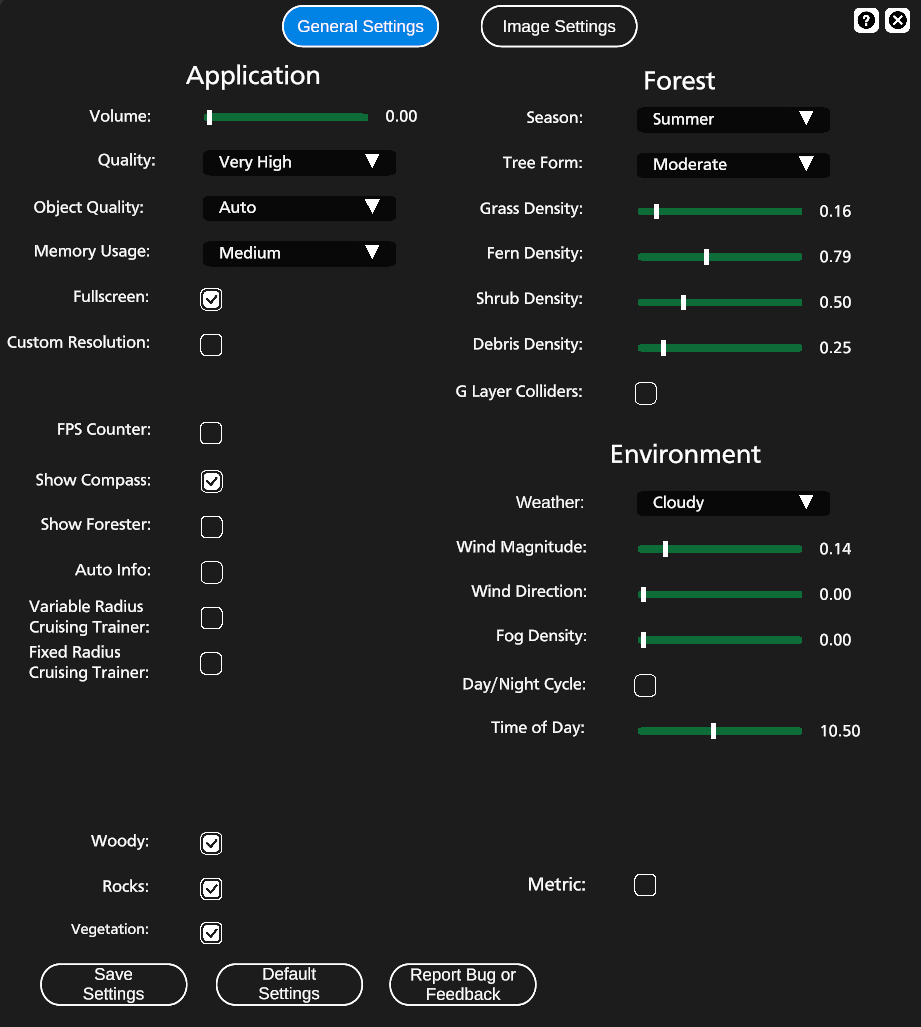
| Application Settings | Descriptions |
| Volume | Adjust the volume of ambient sounds |
| Quality | Change the overall graphics quality. Higher quality looks nice when recording images and videos. A lower quality will result in faster performance. |
| Object Quality | On Auto, objects will adjust their level of detail based on distance, object size, and quality setting. Alternatively, you can lock objects to a single level of detail if you don't want to see them transition. |
| Memory Usage | Sets the size of the cache that stores 3D models in RAM. For a computer with limited RAM, set to small. For computers with 16+ GB of RAM, you can set this to large or unlimited and you will experience less load time for objects that you have previously placed in the same session. |
| Fullscreen | Turn off to use a "windowed" mode. Note that the app is only designed to be functional at aspect ratios close to 16:9. It will not work well if you push the application to a square, portrait, or ultra-wide window. |
| Custom Resolution | Manually set the display resolution |
| FPS Counter | Toggle on a movable panel that counts frames per second |
| Show Compass | Toggle on a compass in the upper right for navigating on the terrain |
| Show Forester | Toggle on human object for a sense of scale--left click a tree to teleport to that location |
| Auto Info | When on, tree info panel will automatically toggle on when clicking a tree--turn off for less interruptions |
| Variable Radius Cruising Trainer | Toggle on a utility which can be used in variable radius cruising training |
| Fixed Radius Cruising Trainer | Toggle on a utility which can be used in fixed radius cruising training |
| Woody Debris | Toggle on the visibility of woody debris built into the terrain |
| Rocks | Toggle on the visibility of rocks built into the terrain |
| Vegetation | Toggle on the visibility of vegetation built into the terrain |
| Metric | If on, inventory reports will use metric units. Table import methods will also assume metric units as inputs. Learn more about units by clicking the hyperlinks. |
| Forest Settings | Descriptions |
| Season | For green leaves on hardwoods, set to Summer. For fall-colored leaves, set to Fall. |
| Tree Form | Adjusts the default height of trees relative to DBH. Adjust this setting to place trees that are "short and squatty" or "tall and skinny". |
| Grass Density | Adjust the density of grass built into the terrain |
| Fern Density | Adjust the density of ferns built into the terrain |
| Shrub Density | Adjust the density of shrubs built into the terrain |
| Debris Density | Adjust the density of woody debris built into the terrain |
| G Layer Colliders | If on, allows Shift+Left Click to move objects on the G structures. If off, objects on these structures will not be selectable. |
| Environment Settings | Descriptions |
| Weather | Change the ambient weather preset |
| Wind Magnitude | Adjust wind speed (no real-world unit). Note, takes a few moments to see changes. |
| Wind Direction | Adjust wind direction (degrees clockwise from north) |
| Fog Density | Adjust visual intensity of fog effect |
| Day/Night Cycle | When on, time of day will progress. When off, time is of day is fixed. |
| Time of Day | Adjust time of day (decimal hours, 24 hour clock) |
| Day Length | If day/night cycle is on, adjust the length of the day (real-world decimal minutes) |
| Night Length | If day/night cycle is on, adjust the length of the night (real-world decimal minutes) |
| Lighting Settings (Page 2) | Descriptions |
| Ambient Light | Adjust the "fill" lighting of the scene |
| Sun Intensity | Adjust the brightness of directional sunlight |
| Shadow Intensity | Adjust the darkness of shadows. For very dark shadows, turn ambient lighting down and turn sun intensity up. |
| Other Image Settings (Page 2) | Descriptions |
| Saturation | Adjust the post-processing saturation |
| Contrast | Adjust the post-processing contrast |
| Brightness | Adjust the post-processing brightness |
| Field of View | Adjust field of view/zoom for all cameras |
| Temperature | Adjust the post-processing color temperature |
| Gamma | Adjust the post-processing gamma |
| Bloom | Adjust the intensity of post-processing bloom effect |
| Focus Distance | Create a "bokeh" focus blur effect similar to a real camera. Set focus distance in meters. |
| Focal Length | Create a "bokeh" focus blur effect similar to a real camera. Increase this value to make the bokeh effect more intense. |
| Utility Buttons (Page 1) | Descriptions |
| Save Settings | Save your current settings for future sessions. These settings will load automatically the next time you run the application. |
| Default Settings | Return to the "factory default" settings |
| Report Bug or Feedback | Use this reporting tool to send information to the developers. The report automatically captures a screenshot and some system reports. Just add a title and description. |
| Utility Buttons (Page 2) | Descriptions |
| Export Saved Position | Save the position of the fixed-position (screenshot) camera to a file so that it can be re-used in a future session. |
| Load Saved Position | Load a position for the fixed-position (screenshot) camera. |